
Sue has a large collection of 35mm and (I think) medium format slides and we’d been looking around for a way of getting some prints from them without giving them to someone else and hoping they’ll take care of them. We discovered in the end that we had all the equipment we needed just lying around in the house!
Of course the first thing we tried was scanning them using the trusty HP OfficeJet all-in-one, but the results were really quite disappointing. We’d tried the same thing with negatives before, with equally disappointing results. The colours were really bad (far too dark), and the resolution was appallingly low.
Next we tried looking at purpose-built slide scanners. These things are quite pricey, and I actually couldn’t find one that was affordable and had Linux support. I had heard you could get slide holders for scanning slides on a conventional scanner, but couldn’t find out much about where to get them from. I did find a page describing how to make one yourself, so we tried that — it was rubbish. It was fun to make, but gave no better results than just scanning the slides as they were.
It was at this point we discovered that the HP scanner hits some sort of resolution limit at about 400dpi, beyond which the results get markedly worse. When the slide is only an inch and a half wide, 400 dots per inch is quite a lot lower than we were hoping for. The advertised resolution of the scanner is 1200dpi, but never mind.
Somewhere I’d read that another approach would be to take digital pictures of the slides on a lightbox. So, slightly resigned to the whole effort being a failure, and about to give up, I suggested to Sue that she should have a quick go at that. Bingo!
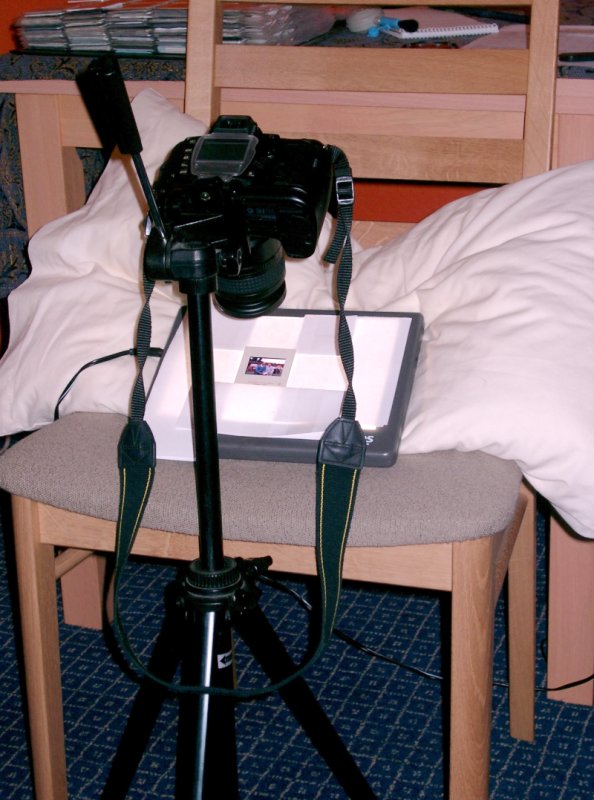 Using a macro lens, a tripod, a lightbox, a chair and a pillow, Sue managed to get much better results than I had with the scanner. To get the slide as close to the lens as it would focus, she inclined the lightbox to about 30 degrees on top of a chair, holding it there with a pillow. The slide was kept in place with some sellotaped bits of paper! Once it was lined up correctly the photo was taken using the infra-red remote shutter release trigger.
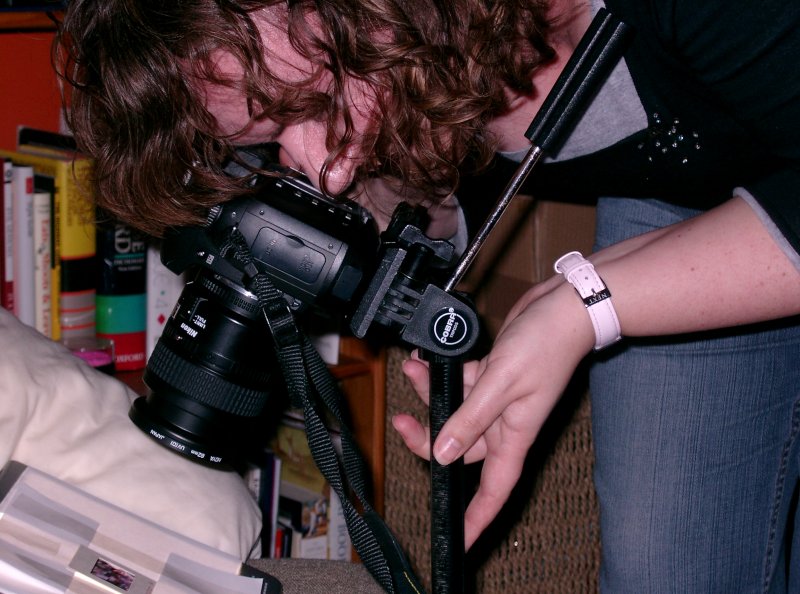 The slides were not quite full frame in the camera, but not very far from it. The lightbox provided a nice evenly-lit background, and the tripod and remote trigger avoided any shaking while taking the picture. Each slide had to be perfectly square on to the lens to make sure it was all in focus.
 Once the pictures were all taken it was just a matter of cropping them on the computer. To get prints from these digitized images, we’ll probably take the easy route and send them to PhotoBox. 🙂
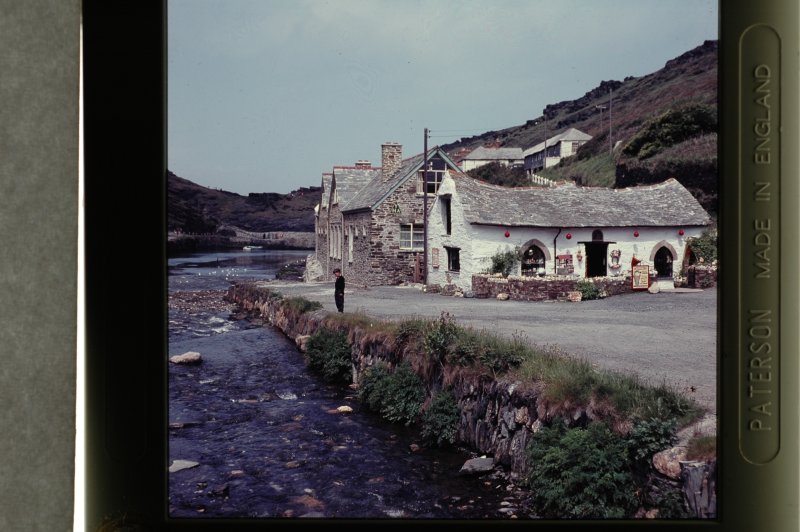
Here is a reduced-size version of the finished result, a picture of the Pixie House (Harbour Lights) in Boscastle, taken sometime in the 1960s:
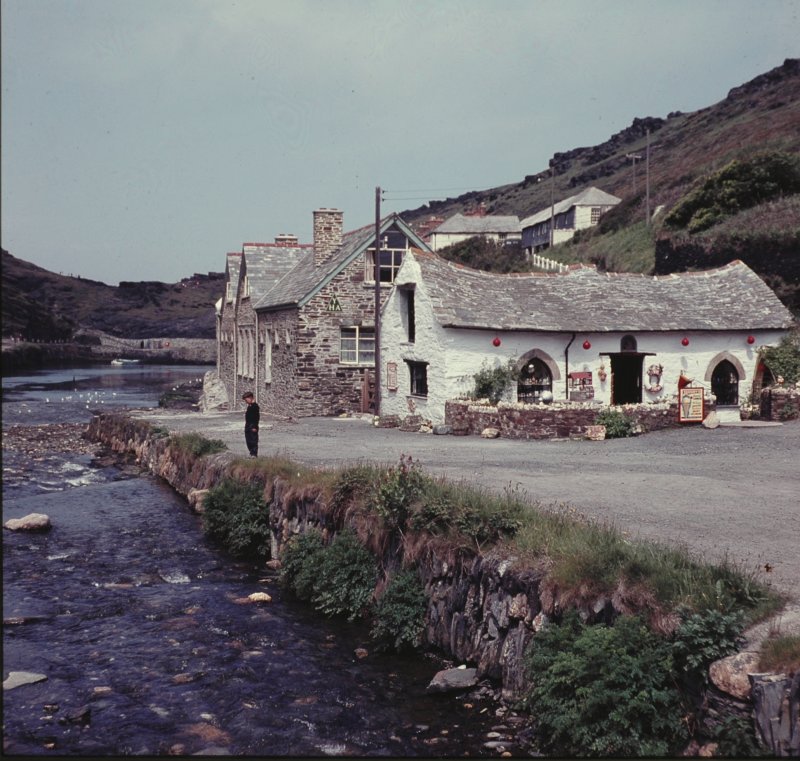
UPDATE: This building was washed away during flooding in recent years. Since then, we visited Boscastle and took some pictures. Here is a picture of the rebuild:

Comments
124 responses to “Digitizing 35mm slides without a slide scanner”
Tim,
You’re a genious! I can’t wait to try the lightbox approach to scanning slides. We have no less than four scanners at home, and while three are hand-me-downs, the last thing I want to do is buy another just to scan old 35 mm slides. I found your site while looking for ideas on how to build a lightbox to put on top of one of these flatbed scanners. Your approach never occured to me.
Thanks,
Paul Marsh
Paul: it was my wife’s idea; it hadn’t occurred to me either..
You can make it more cheery with an image editor. I used Layer | Colours | Curves in the GIMP to make it brighter. Nice snap.
regds Geoff
Hi, folks, I’ve just found this:
http://www.hammacher.com/publish/74083.asp
A slide scanner for just US$ 99. I’ll give a try to
projecting slides and if it doesn’t work, I’ll buy this.
Thanks for all advices.
Regards, João
You can find the same item here, for just under £99.00, but having never tried this I have no idea about the quality. Price seems ok though /. It would be good to hear from someone who has tried this method as “Tim`s” method is a bit laborious for me
http://www.technologyinthehome.com/Items/FS00VSTA?sck=89992548&gclid=CP2t1oqvpI4CFQ0eEgodWXJVZg
Having just tried,and returned to supplier,a slide scanner priced at about £100,I looked for a better and faster,method and your lightbox idea prompted me to look to see what I had.I had a very old slide viewer made by Hanorama in the 50s.Using this,and bits of blutac to hold camera in position, then using macro mode and zoom to fill the screen, the results were much better than the scanner.The slide viewer is meant to be hand held with natural light, but a light source can be directed on to its ground glass screen. Its memories I want to save,results are not up tp professional,but a lot cheaper!!
Great forum and a lot of good idea’s. I also have a bazillion slides I’d like to eventually digitize without spending hundreds of $. Your Boscastle picture looks fine to me. Being taken in the UK somewhare, I bet it was a cloudy sky and perhaps in the wintertime when colors might be more drab anyway. What kind of light did you use in your light box for a backlight? Incandecent, Florescent, Watts? Was it uniform? I guess I need to look up how to build a light box. I have a slide sorter which is kind of a light box. Anyway, I think I’ll give it a try before breaking th bank on a piece of equipment.
Larry: it was a shop-bought lightbox, uniform fluorescent I guess. These are really cheap and not worth trying to make yourself I would say.
I think the faded colours on the Boscastle slide are largely because of the age of the slide (it’s from the 1960s).
Having taken pictures in the 60’s the picture of Boscastle looks like a typical product of an Ilford film which always gave muted colours and a pinkish tinge. The alternative was Kodak that looked like you had poured ink into the sea. I am about to try and convert a whole load of slides to digital and am going to try photographing them projected onto a screen, but put the slide in backwards and take the photo from the back so that the camera doesn’t get in the way. This should avoid most of the distortion caused by puting it to one side. Has anyone tried this?
Yes, it is indeed Ilford film! That explains it…
Having read some of your earlier posts, I too decided to go for a light box, and perhaps now I can add my experience to this pool.
To start with, I tried a lamp behind some obscure Perspex on which I mounted the slide, with my Nikon Coolpix 885 in close-up mode, a few cm in front. There were two problems. Whether I used a tungsten lamp, or a low energy one, I was getting a colour cast, and in close-up mode, I could not adjust the white balance on my camera. The other problem was that I got reflections of the camera off the glossy film.
One sunny day, I decided that daylight should be good enough, and did away with the lamp!
It eventually evolved into a set-up with the camera mounted on a piece of timber, (about 4” x 6”) and a slide holder backed by the Perspex, mounted just in front of the lens. Between the camera & slide holder, I fitted a piece of black tube, to get rid of the reflection problem. With everything fixed, there’s no problem with camera shake.
It works quite well, and is very quick, but as the camera is in macro mode, the edges of the frame become distorted, and I then have to crop each one in another application. I was telling my brother about this, and he said “I’ve got a new Epson scanner with a film & slide attachment that you could have”!
It’s the Epson Perfection 1260, and my first try was at max resolution of 9600 dpi, to see what it would do. 1hr 40 minutes for one slide!!
I’ve now settled on 800 dpi, which probably takes about 1 minute, but 3 times that, by the time it has done a pre-scan, & you’ve adjusted exposure etc. The camera is far quicker, with a higher resolution, and for well exposed originals, would be my first choice. The scanner is too slow, but the Epson software copes well with adjustments for exposure etc before the scan proper, and automatically adjusts for portrait or landscape. With the camera, every slide has to be landscape. The one mod I might try with the camera, is to increase the distance between slide & lens, which should reduce the pin-cushioning.
As someone has already said, it is more important to preserve the memories than worry too much about the quality.
Nobody has tried yet the Plustek Opticfilm 7200i slide/film scanner sold for 160 £ at Amazon.co.uk?
I have been working the way more or less similar to Tim. The light box I constructed is fairly simple and very effective. Take a small cardboard box about 2″ deep. Cut a rectangular hole of a size slightly bigger than a 35mm slide . Then cut a circular hole on the other side of the box big enough to let in the lens ( with its barrel, as it comes out of camera body when it is ready to take a picture ). Hole should be just big enough to take in the lens barrel snugly – we don’t want any light to leak in. The circular hole and the rectangular hole should be aligned with each other. Now hold a slide firmly against the window and view the slide on camera LCD display. Ok the camera cannot focus on the slide, it sees through it and focuses on some object beyond the slide. You need a diffuser. Use a piece cut out from a white polythene shopping bag and you are done. So now you have a camera with its lens barrel snugly inserted into a card board box, and you have a slide held firmly against a rectangular window on the other side of the box and a piece of white polythene paper covering the slide. You should be able to see the slide on the camera LCD and it will automatically focus on it ( you are using micro focus range ). Our cut out window is slightly bigger than transparent film ( but smaller than the slide mount ). You can move the slide so that it is exactly centered on the camera display. Mark this position. Glue two thick cardboard strips at right angle on the cardboard box near the rectangular window as place holder for the slide. With these place holders glued to the box you now don’t need to align the slide everytime – just hold it on the window against these right angled place holders that will ensure that it remains exactly in the same position aligned with the camera lens. The polythene sheet also can be glued at one edge so that it can be flipped up when you want to put a slide and then let it just falls down to cover the slide. Now just go out on the terrace where you have bright sun light, point at the sun directly and click. You will get excellent results. You must have realised that the camera and the box and the slide are firmly held to each other and therefore act as one unit. There is no relative movement and therefore there is no need of holding the camera steady etc. Since sun light is really very bright you get quick exposures with true colours. You can click away at 10 seconds a slide. Some tips
1. Camera barrel should be inserted in the box to the hilt so that focussing does not change every time. You will have to find out what should be depth of the box to use. That will depend on the camera you have. In my case with Nikon Coolpix I needed a box 2″ deep.
2. Paint inside of box with black paint.
3. Make arrangements so that camera remains fixed to the box ( it has tendency to turn about the circular hole we made for camera ).
4. Camera though can shoot from very closed range ( 2 inch etc ) it invariably introduces a little barrel distortion. Don’t go too close to the slide. Take from a distance a little more than what minimum distance your camera can handle. Then crop the image on a PC.
5. Choose the right size of the box ( the depth ) to get the size of image you want with zero zoom. Changing camera zoom everytime is useless exercise and wastes time.
6. Camera retracts the lens barrel if it idles for some time ( about 2 minutes ). Some cameras have adjustment so that the lens does not retract. Just ensure that your camera does not idle long enough for it to retract the lens. Since lens barrel is snugly held in the box it could load the lens drive motor of the camera.
I have a canon power shot A530 and i am searching for a slide copier but i cannot find any.
a there any way to create one .
i have more then 500 slide and more then 200 negative that i need to scan urgently.
i really need help.
best regards
fadi yassine
Check your software that came with digital camera. Some allow you to connect camera and operate from PC or laptop, which would allow you to take the pictures on lightbox or screen, without touching the camera. With my canon a70 I can adjust all settings and preview from the laptop after it is connected.
I have a BPM Universal Bellows Unit and a Focuslide from 30 years ago, with which I was able to copy slides easily onto print film using a SLR with its lens mounted back to front on the bellows unit. I now mount the bellows unit and focuslide onto one tripod, then line it up with the camera, a Panasonic DMC FZ8 on a second tripod. For this exercise I bought a Hoya filter close-up set 55mm and the Panasonic lens adaptor. When screwed onto the camera and putting it in macro mode I am able to move the slide on its carrier, coupled with zooming, and adjust the focus accordingly, depending upon whether I want to copy the entire slide or enlarge a part of it. I always use the aperture priority to give good depth of field and using the 2-second self-timer avoids camera shake.
I realised it would be a waste of money buying a scanner with poor resolution when the camera itself has 7.2m pixels that might be harnessed for the task. After just two preliminary sessions the results are better than I had hoped for and the only problem was getting an even light source, whether by natural light or a halogen bedside lamp. I need to buy a light box in order to do slide sorting anyway and realising that it could also serve as an even light source I went on a web-search for the product and found your site within seconds.
If I can find a small table with adjustable legs I can place the light table on it and present it beneath the camera between the legs of the tripod. It is less back aching to shoot horizontally so I’ll need to work out how to mount the light box vertically on a tripod or place it on a tabletop. I think that clamping a batten of wood across the face of the light box, on which to place the slide, is preferable to taping the slide mount onto the light box.
Great ideas for copying slides – I was going to buy a slide scanner but have given the ideas on this page a go particularly the A V Veerkar idea. I only have an Ixus 50 compact so its difficult to attach anything to the lens.
I too made a box on a baseplate but this time from 10mm MDF with a 31mm hole for the lens. I used a bolt from underneath the baseplate into the tripod mount so the camera was securely fixed to the baseplate and aligned exactly in the centre of the hole. (The lens body is 28mm outside diameter so this gives some tolerance but doesn’t let much back light in). The other side of the box is 31mm away from the end of the lens and has a hole through which the camera can see the slide and a couple of wooden mounting strips so the the slide can be dropped in and is held in place (as in a single slide mount.) A piece of white polythene bag acts a a diffuser. I didn’t paint the inside of the box black as this seemed unnecessary.
Since the camera and slide are always in a fixed relationship, once you have selected macro mode and no flash the process is very quick indeed. Certainly a slide every 10 -15 seconds is possible. The automatic settings do their job very well and obviously you dont’ have to worry about camera shake or alignment.
There is some barrel distortion but I tend to use PhotoShop CS to make any adjustments to slides in anycase so a little cropping isn’t a problem – very little if any of the projected image is lost. Some of the photos are Instamatic shots from the 1960’s and the results are very good indeed. I’ve tried various light sources including looking at a silde projector but sunlight seems best. Even on a very murky day in Southern England.
Thanks a lot for the posts
The below link will take you to the simple answer for qlide copying.
http://www.firstcall-photographic.co.uk/categories/copying-equipment/115/1
Note that the Ohnar slide duplicator/copier is only one of a number that have been around for many years. Using a similar duplicator with a Canon EOS 600 in the past I was able to duplicate slides for an A/V show that won an International A/V competition so quality was not an issue in this case.
I have not tried copying via the Ohnar et al from slide to digital but as we have complete control over the digital image it should be easier than duplicating a slide where control is only available at the time of exposing the image.
Hope this helps, good luck with the 10,000 slides by the way.
John Phillipson
I use my old slide show equipment. I have an all-in-one Ambico Video Transfer box, I marry my Kindermann projector up to it. The Ambico has its own macro lens. This is mounted on a bench, my digital camera is floor mounted on a tripod with the camera set to the height of the box. I insert a magazine in the projector which reflects the slide in the box. When the camera is switched on I wait a few seconds for it to settle down, focus, then press record. I hold each slide for approx 25seconds. I just need to remote the magazine to the next slide. On my computer I have installed Pinnacle Studio 9. After transfering the slides to the camera I just capture to Pinnacle as normal, now I can edit in the usual way, add music and voice, transitions, titles ect: By giving my slides the 25seconds I now have leeway to to adjust each down to the time I want,then output to DVD which can be played on a DVD player or projected on to a screen. I may not have the right jargon for this lark but when I was born they were still using candlelight magic lanterns!
(Tim: thanks for establishing this forum.)
My immediate interest is 35mm microfilm (cf 20 July 2007, “Batesy”): I was greatly disappointed to discover that the Brit. Library’s “microform” format, for selling theses, is 35mm microfilm rather than microfiche.
Below:
1: QUERY: 4000 DPI SCANNERS
2: ASIDE: MAX. USEFUL DPI
3: MY APPLICATION: TIME CONSTRAINTS
4: EXPERIENCE: B+W -ve -> slide +ve -> -ve print
[1: QUERY: 4000 DPI SCANNERS:]
Many posts here express dissatisfaction with dedicated 35mm scanners. If this is your experience, could you please report the spec’s of the scanner, as well as the model?
I’m curious as to whether 4000 dpi scanners have disappointed anyone, either with picture quality, or with post-processing overheads. 4000 dpi on a 24x36mm frame would be apx 24Mpix (though I don’t know if the frame-size on microfilm matches that of 35mm SLR cameras.); at face-value, one might expect the results to surpass a digital camera copy. But in practice? (Mog need not reply).
[2: ASIDE: MAX. USEFUL DPI]
Around 10 or 15 years ago I went through the exercise of calculating a theoretical dpi to match the grain-size in recording-film (emulsions optimized for detail, at the expense of tonal gradation, as used in microfilm). I don’t have the figures at hand, but my recollection is that I came up with a figure around 20-24 Mpix for 24x36mm, assuming pixel-size matches grain-size. That kind of approximation will still lose detail (due to averaging when grain-crystal edges overlap pixel borders); a Nyquist model would lead you to 80-96 Mpix, or around 8000 dpi. But, as grain presents in a range of sizes, one might double this dpi before throwing away the negative…
[3: MY APPLICATION: TIME CONSTRAINTS]
Consider: a thesis will have several hundred pages; I have an initial crop of 5 to read. These will lead to others. Any post-processing longer than a minute per page will be impractical. Even cropping the frame into individual pages is likely to occupy this time. (Though my initial problem is just affording the theses, let alone a scanner, or macro lens for the digital!)
[4: EXPERIENCE: B+W -ve -> slide +ve -> -ve print]
My father used to have a bellows-attachment, which I used in the 70’s. Around 5 years ago, no longer having this item, I copied some old deteriorating b+w negatives by macro lens 35mm SLR onto colour slide, and had these printed as negatives through a ordinary photo service. I jury-rigged a negative-holder onto the camera, back-lit by halogen lamp reflected off white paper. The result was lowish contrast, with a blue-mauve hue, but quite clear. Certainly worth having for the memories.