
Sue has a large collection of 35mm and (I think) medium format slides and we’d been looking around for a way of getting some prints from them without giving them to someone else and hoping they’ll take care of them. We discovered in the end that we had all the equipment we needed just lying around in the house!
Of course the first thing we tried was scanning them using the trusty HP OfficeJet all-in-one, but the results were really quite disappointing. We’d tried the same thing with negatives before, with equally disappointing results. The colours were really bad (far too dark), and the resolution was appallingly low.
Next we tried looking at purpose-built slide scanners. These things are quite pricey, and I actually couldn’t find one that was affordable and had Linux support. I had heard you could get slide holders for scanning slides on a conventional scanner, but couldn’t find out much about where to get them from. I did find a page describing how to make one yourself, so we tried that — it was rubbish. It was fun to make, but gave no better results than just scanning the slides as they were.
It was at this point we discovered that the HP scanner hits some sort of resolution limit at about 400dpi, beyond which the results get markedly worse. When the slide is only an inch and a half wide, 400 dots per inch is quite a lot lower than we were hoping for. The advertised resolution of the scanner is 1200dpi, but never mind.
Somewhere I’d read that another approach would be to take digital pictures of the slides on a lightbox. So, slightly resigned to the whole effort being a failure, and about to give up, I suggested to Sue that she should have a quick go at that. Bingo!
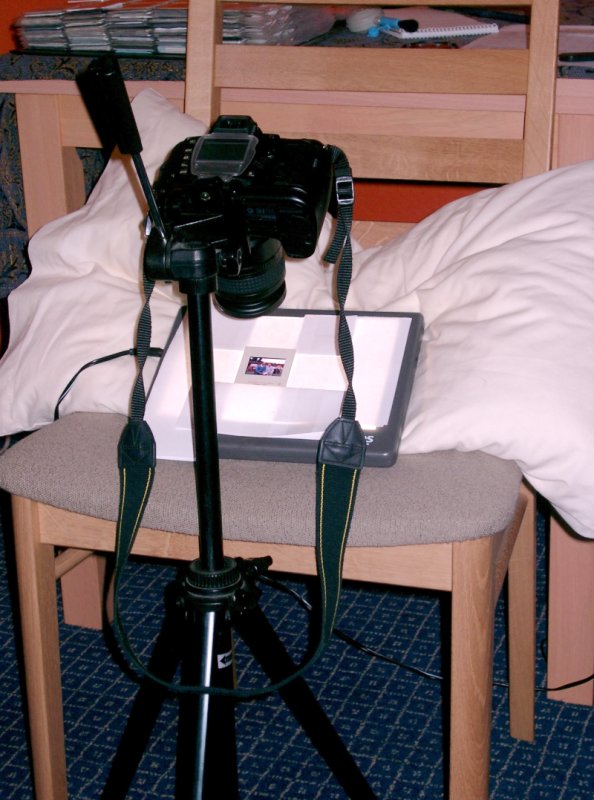 Using a macro lens, a tripod, a lightbox, a chair and a pillow, Sue managed to get much better results than I had with the scanner. To get the slide as close to the lens as it would focus, she inclined the lightbox to about 30 degrees on top of a chair, holding it there with a pillow. The slide was kept in place with some sellotaped bits of paper! Once it was lined up correctly the photo was taken using the infra-red remote shutter release trigger.
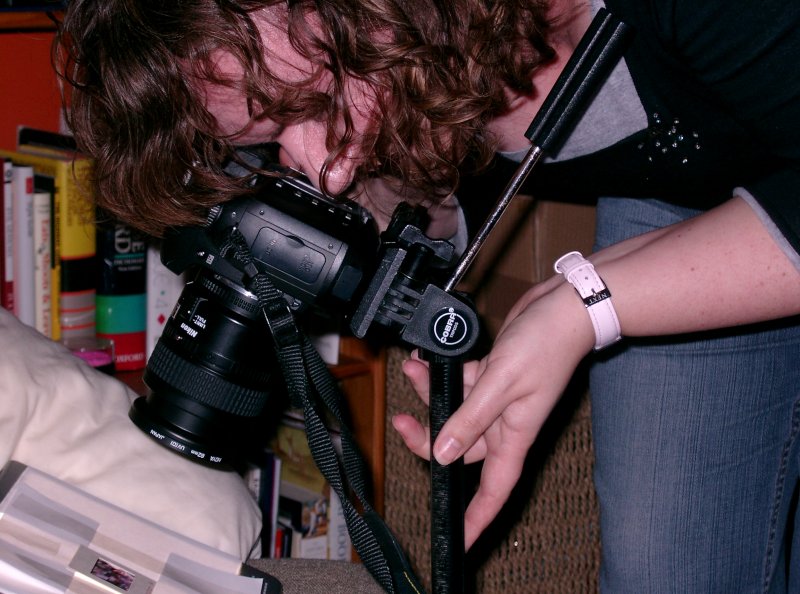 The slides were not quite full frame in the camera, but not very far from it. The lightbox provided a nice evenly-lit background, and the tripod and remote trigger avoided any shaking while taking the picture. Each slide had to be perfectly square on to the lens to make sure it was all in focus.
 Once the pictures were all taken it was just a matter of cropping them on the computer. To get prints from these digitized images, we’ll probably take the easy route and send them to PhotoBox. 🙂
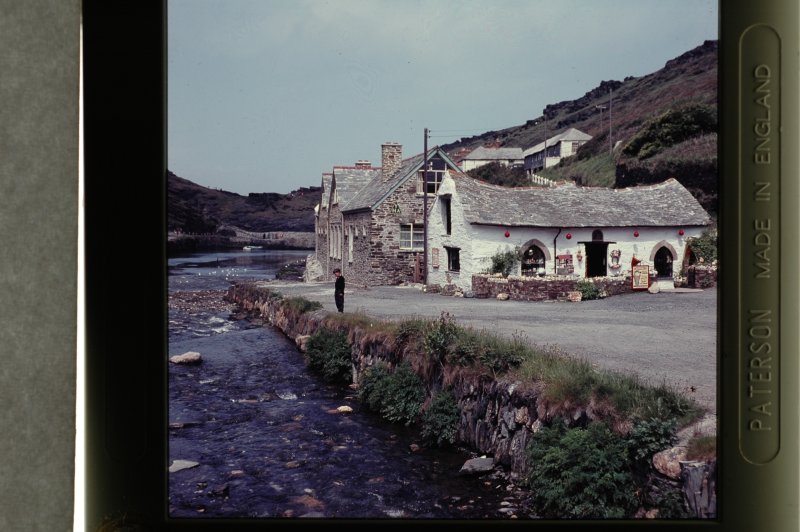
Here is a reduced-size version of the finished result, a picture of the Pixie House (Harbour Lights) in Boscastle, taken sometime in the 1960s:
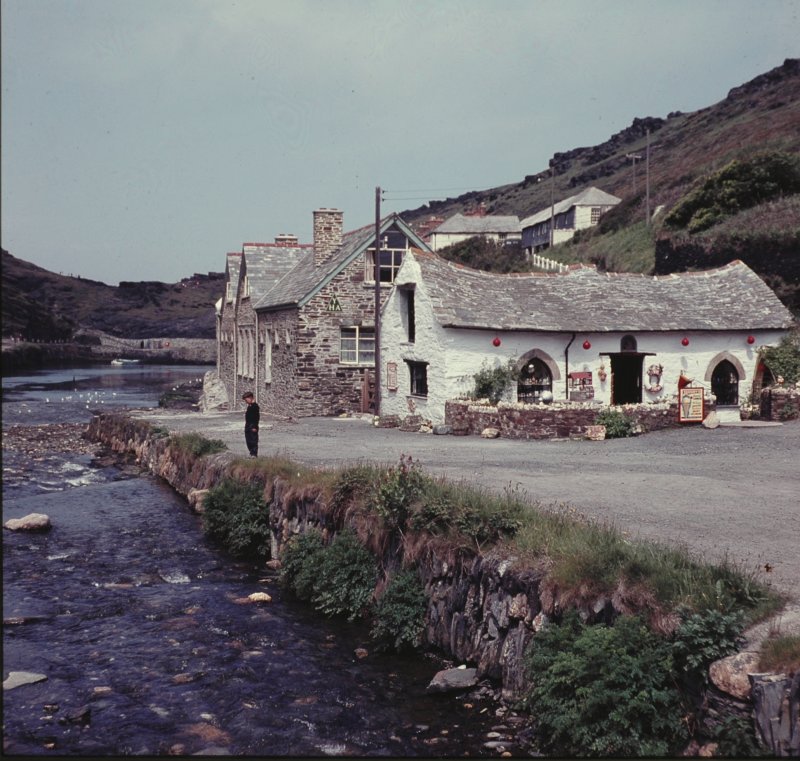
UPDATE: This building was washed away during flooding in recent years. Since then, we visited Boscastle and took some pictures. Here is a picture of the rebuild:

Comments
124 responses to “Digitizing 35mm slides without a slide scanner”
Ye gods. That must take a lot of effort.
I borrowed a Canoscan 4000FS slide scanner from a friend and used it (with Windows) to scan some of my mother’s old slides from the 60s. Time consuming though. I need to do some more.
What sort of resolution does a real slide scanner give? We’ve been getting about 2,500 pixels across for a 35mm slide.
It isn’t too much effort once you set everything up. Cropping is quick, but colour adjustments (which I think are probably always necessary whichever method you use) were a bit fiddly.
Wow! This is just what I’m looking for! Thanks, Tim, for going through the whole scanner route first, so as to rule it outl You saved me a ton of effort.
Guess I’m gonna drag out the tripod today. Yay!
Mirth Maker
Thank you for posting this info. I struggled with a friend’s Epson – it kept cropping the slides. It took us 2 hours just to scan 10 slides. Having a Dell all in one, there is no software/hardware kit available via Dell to do slides, and it costs £40 to have 10 images produced at one of the local print shops. Having hundreds of slides, this will save me a ton of money. Thank you so much.
It’ll save money if you already have a macro lens. 🙂
For what it’s worth, we used a AF Micro Nikkor 60mm lens attached to a Nikon D70.
Hay Tim, This looks like a wonderful Idea. I’m wondering about what size was the box, and whether you used these new electricity saving bulbs or rigular, and the wattage.
I’m going to try this !
Don
It’s a normal light box, the kind you can get for about £15 at Jessops.
Hello Tim, you have done what I have had in mind for over one year now, i.e. photographing slides with a digital camera. In the past I used bellows with a slide holder attached at the end, to duplicate slides on film. I thought this would work also with a digital camera. I tried the Nikon D200, but the Nikon pb-6 bellows would not fit. In addition the format is now different from the 24×36 mm. I have repeatdly written to Nikon and lately also to Canon to ask them to produce a lens or a simple device to photograph slides with a digital camera, but they did non bother to reply. Apparently all they want is to sell their costly scanners which yeld poor results. So, I will now follow your advice and build myself a box. Thank you for your efforts. FM.
Let me get this straight … nice Nikon DSLR, nice bit of Nikkor glass … take pictures of slide with a light behind it on a pillow??? Did you hate that slide? Because the digital version looks like some weathered old postcard in a forgotten seaside shop.
Nikon 5000 ED 16 bit 4000 dpi scanner, Digital ICE works magic with image enhancement and scratch removal. Under £500 on ebay, or pay a professional to do a few slides for around 60p.
Was that slide taken by a good photographer? It’s a lovely place in Cornwall, historic picture, but the greenery in the background is completely blurred and the sky is like dishwater, even on a web page. If you care about images, there’s a better way.
You always get one don’t you!!
Mog is obviously a geek with more money than sense.
Looks like a good way to store all those old slides taken years ago where the recalled memory is more important than qualty of the image. I’ll certainly give it a go
A thought.
Has anyone tried projecting a 35 mm slide onto a clean screen, and photographing – with flash off – the projected image using a digital camera on a tripod? The camera image is a jpg file. Advance the projector one slide, CLICK, repeat, I’d think. Scanner seems to need a good minute to complete a higher resolution scan. I’d think this would go faster, and be more reproducible.
Dennis
I think it might be harder to avoid perspective distortion if you project onto a screen, but perhaps it depends on what lens you use. Photographing the slides directly didn’t have any perspective distortion that I noticed, not that I was particularly looking — as Grahame said, the recalled memory was the important thing in this case.
thanks for your page. I have some 10000 slides from all over and did try projecting them on to a screen and digitizing. Only some 10% gave me decent quality, with lot of distortions and darkness. I have not tried the light box trick since I did not have a macro digital camera, but will try soon.
I have photographed slides projected on screen with reasonable results,camera positioned behind and just to one side of projector on a tripod.One problem is having to manualy press shutter button.Is there a cable release for digital cameras.Mine is Panasonic fz5.
I like Tims idea of using light box as this would eliminate projector lens and screen.Think Ill give it a try.
> Is there a cable release for digital cameras.Mine is Panasonic fz5.
Not sure about that model but Panasonic do seem to do some kind of remote shutter.
The Nikon one uses infra-red… 🙂
This seems like an awful lot of effort to save a few pounds. Why don’t you just use a slide copier on your camera?
These are like a telephoto lens with a slide holder at the end. You can zoom in and crop the image and you don’t need a cable release, because you can easily adjust the lighting to enable a fast shutter speed.
Oh, not heard of them! The reason we did it the way we did was because we already had a macro lens and a light-box.
Just a thought, could a PC monitor displaying a nice bright white screen be used as the lightbox? Would this be bright enough? Have to lay monitor down (or use tape). Cost practically zero – results probably hopeless.
In the absence of a cable release, your self-timer works fine as a hands-off release. Some cameras even have a short-delay setting of a couple of seconds or so, so there’s no need to wait for the full 10 seconds (whistling some random hurry-up notes for each of 10,000 slides…).
The prospect of getting my thousands of slides into digital folders after decades in the dark has got me really fired up!
Delighted to have found your ‘thread’.
Hi folks, a mate posted me the link to this forum and the input from everyone seems very informative.
Inclined to agree with Mog however, the colours quite simply are`nt there in the Boscastel photo. Nice photo, but drab. I reckon if it were compared with the original then there would be no dispute. However, thats not realy what I`m on here for.
I was particualrly interested in Steve Frank`s posting re a slide copier to fit a camera. My “project to be” is not just slides or film strips but rolls of film. ie. 35mm roll of film. Old newspapers on microfilm to be more precise. Have you had any experience Steve with photographing films ?
I`ve not heard of the device you mention but I would shirly be willing to try it out as I imagine it is a long way cheaper than a scanner. I imagine we all have a scanner but are reluctant to upgrade to a slide/film scanner if it is not warranted ???????
Look fwd to a reply
Tim,
You’re a genious! I can’t wait to try the lightbox approach to scanning slides. We have no less than four scanners at home, and while three are hand-me-downs, the last thing I want to do is buy another just to scan old 35 mm slides. I found your site while looking for ideas on how to build a lightbox to put on top of one of these flatbed scanners. Your approach never occured to me.
Thanks,
Paul Marsh
Paul: it was my wife’s idea; it hadn’t occurred to me either..
You can make it more cheery with an image editor. I used Layer | Colours | Curves in the GIMP to make it brighter. Nice snap.
regds Geoff
Hi, folks, I’ve just found this:
http://www.hammacher.com/publish/74083.asp
A slide scanner for just US$ 99. I’ll give a try to
projecting slides and if it doesn’t work, I’ll buy this.
Thanks for all advices.
Regards, João
You can find the same item here, for just under £99.00, but having never tried this I have no idea about the quality. Price seems ok though /. It would be good to hear from someone who has tried this method as “Tim`s” method is a bit laborious for me
http://www.technologyinthehome.com/Items/FS00VSTA?sck=89992548&gclid=CP2t1oqvpI4CFQ0eEgodWXJVZg
Having just tried,and returned to supplier,a slide scanner priced at about £100,I looked for a better and faster,method and your lightbox idea prompted me to look to see what I had.I had a very old slide viewer made by Hanorama in the 50s.Using this,and bits of blutac to hold camera in position, then using macro mode and zoom to fill the screen, the results were much better than the scanner.The slide viewer is meant to be hand held with natural light, but a light source can be directed on to its ground glass screen. Its memories I want to save,results are not up tp professional,but a lot cheaper!!
Great forum and a lot of good idea’s. I also have a bazillion slides I’d like to eventually digitize without spending hundreds of $. Your Boscastle picture looks fine to me. Being taken in the UK somewhare, I bet it was a cloudy sky and perhaps in the wintertime when colors might be more drab anyway. What kind of light did you use in your light box for a backlight? Incandecent, Florescent, Watts? Was it uniform? I guess I need to look up how to build a light box. I have a slide sorter which is kind of a light box. Anyway, I think I’ll give it a try before breaking th bank on a piece of equipment.
Larry: it was a shop-bought lightbox, uniform fluorescent I guess. These are really cheap and not worth trying to make yourself I would say.
I think the faded colours on the Boscastle slide are largely because of the age of the slide (it’s from the 1960s).
Having taken pictures in the 60’s the picture of Boscastle looks like a typical product of an Ilford film which always gave muted colours and a pinkish tinge. The alternative was Kodak that looked like you had poured ink into the sea. I am about to try and convert a whole load of slides to digital and am going to try photographing them projected onto a screen, but put the slide in backwards and take the photo from the back so that the camera doesn’t get in the way. This should avoid most of the distortion caused by puting it to one side. Has anyone tried this?
Yes, it is indeed Ilford film! That explains it…
Having read some of your earlier posts, I too decided to go for a light box, and perhaps now I can add my experience to this pool.
To start with, I tried a lamp behind some obscure Perspex on which I mounted the slide, with my Nikon Coolpix 885 in close-up mode, a few cm in front. There were two problems. Whether I used a tungsten lamp, or a low energy one, I was getting a colour cast, and in close-up mode, I could not adjust the white balance on my camera. The other problem was that I got reflections of the camera off the glossy film.
One sunny day, I decided that daylight should be good enough, and did away with the lamp!
It eventually evolved into a set-up with the camera mounted on a piece of timber, (about 4” x 6”) and a slide holder backed by the Perspex, mounted just in front of the lens. Between the camera & slide holder, I fitted a piece of black tube, to get rid of the reflection problem. With everything fixed, there’s no problem with camera shake.
It works quite well, and is very quick, but as the camera is in macro mode, the edges of the frame become distorted, and I then have to crop each one in another application. I was telling my brother about this, and he said “I’ve got a new Epson scanner with a film & slide attachment that you could have”!
It’s the Epson Perfection 1260, and my first try was at max resolution of 9600 dpi, to see what it would do. 1hr 40 minutes for one slide!!
I’ve now settled on 800 dpi, which probably takes about 1 minute, but 3 times that, by the time it has done a pre-scan, & you’ve adjusted exposure etc. The camera is far quicker, with a higher resolution, and for well exposed originals, would be my first choice. The scanner is too slow, but the Epson software copes well with adjustments for exposure etc before the scan proper, and automatically adjusts for portrait or landscape. With the camera, every slide has to be landscape. The one mod I might try with the camera, is to increase the distance between slide & lens, which should reduce the pin-cushioning.
As someone has already said, it is more important to preserve the memories than worry too much about the quality.
Nobody has tried yet the Plustek Opticfilm 7200i slide/film scanner sold for 160 £ at Amazon.co.uk?
I have been working the way more or less similar to Tim. The light box I constructed is fairly simple and very effective. Take a small cardboard box about 2″ deep. Cut a rectangular hole of a size slightly bigger than a 35mm slide . Then cut a circular hole on the other side of the box big enough to let in the lens ( with its barrel, as it comes out of camera body when it is ready to take a picture ). Hole should be just big enough to take in the lens barrel snugly – we don’t want any light to leak in. The circular hole and the rectangular hole should be aligned with each other. Now hold a slide firmly against the window and view the slide on camera LCD display. Ok the camera cannot focus on the slide, it sees through it and focuses on some object beyond the slide. You need a diffuser. Use a piece cut out from a white polythene shopping bag and you are done. So now you have a camera with its lens barrel snugly inserted into a card board box, and you have a slide held firmly against a rectangular window on the other side of the box and a piece of white polythene paper covering the slide. You should be able to see the slide on the camera LCD and it will automatically focus on it ( you are using micro focus range ). Our cut out window is slightly bigger than transparent film ( but smaller than the slide mount ). You can move the slide so that it is exactly centered on the camera display. Mark this position. Glue two thick cardboard strips at right angle on the cardboard box near the rectangular window as place holder for the slide. With these place holders glued to the box you now don’t need to align the slide everytime – just hold it on the window against these right angled place holders that will ensure that it remains exactly in the same position aligned with the camera lens. The polythene sheet also can be glued at one edge so that it can be flipped up when you want to put a slide and then let it just falls down to cover the slide. Now just go out on the terrace where you have bright sun light, point at the sun directly and click. You will get excellent results. You must have realised that the camera and the box and the slide are firmly held to each other and therefore act as one unit. There is no relative movement and therefore there is no need of holding the camera steady etc. Since sun light is really very bright you get quick exposures with true colours. You can click away at 10 seconds a slide. Some tips
1. Camera barrel should be inserted in the box to the hilt so that focussing does not change every time. You will have to find out what should be depth of the box to use. That will depend on the camera you have. In my case with Nikon Coolpix I needed a box 2″ deep.
2. Paint inside of box with black paint.
3. Make arrangements so that camera remains fixed to the box ( it has tendency to turn about the circular hole we made for camera ).
4. Camera though can shoot from very closed range ( 2 inch etc ) it invariably introduces a little barrel distortion. Don’t go too close to the slide. Take from a distance a little more than what minimum distance your camera can handle. Then crop the image on a PC.
5. Choose the right size of the box ( the depth ) to get the size of image you want with zero zoom. Changing camera zoom everytime is useless exercise and wastes time.
6. Camera retracts the lens barrel if it idles for some time ( about 2 minutes ). Some cameras have adjustment so that the lens does not retract. Just ensure that your camera does not idle long enough for it to retract the lens. Since lens barrel is snugly held in the box it could load the lens drive motor of the camera.
I have a canon power shot A530 and i am searching for a slide copier but i cannot find any.
a there any way to create one .
i have more then 500 slide and more then 200 negative that i need to scan urgently.
i really need help.
best regards
fadi yassine
Check your software that came with digital camera. Some allow you to connect camera and operate from PC or laptop, which would allow you to take the pictures on lightbox or screen, without touching the camera. With my canon a70 I can adjust all settings and preview from the laptop after it is connected.
I have a BPM Universal Bellows Unit and a Focuslide from 30 years ago, with which I was able to copy slides easily onto print film using a SLR with its lens mounted back to front on the bellows unit. I now mount the bellows unit and focuslide onto one tripod, then line it up with the camera, a Panasonic DMC FZ8 on a second tripod. For this exercise I bought a Hoya filter close-up set 55mm and the Panasonic lens adaptor. When screwed onto the camera and putting it in macro mode I am able to move the slide on its carrier, coupled with zooming, and adjust the focus accordingly, depending upon whether I want to copy the entire slide or enlarge a part of it. I always use the aperture priority to give good depth of field and using the 2-second self-timer avoids camera shake.
I realised it would be a waste of money buying a scanner with poor resolution when the camera itself has 7.2m pixels that might be harnessed for the task. After just two preliminary sessions the results are better than I had hoped for and the only problem was getting an even light source, whether by natural light or a halogen bedside lamp. I need to buy a light box in order to do slide sorting anyway and realising that it could also serve as an even light source I went on a web-search for the product and found your site within seconds.
If I can find a small table with adjustable legs I can place the light table on it and present it beneath the camera between the legs of the tripod. It is less back aching to shoot horizontally so I’ll need to work out how to mount the light box vertically on a tripod or place it on a tabletop. I think that clamping a batten of wood across the face of the light box, on which to place the slide, is preferable to taping the slide mount onto the light box.
Great ideas for copying slides – I was going to buy a slide scanner but have given the ideas on this page a go particularly the A V Veerkar idea. I only have an Ixus 50 compact so its difficult to attach anything to the lens.
I too made a box on a baseplate but this time from 10mm MDF with a 31mm hole for the lens. I used a bolt from underneath the baseplate into the tripod mount so the camera was securely fixed to the baseplate and aligned exactly in the centre of the hole. (The lens body is 28mm outside diameter so this gives some tolerance but doesn’t let much back light in). The other side of the box is 31mm away from the end of the lens and has a hole through which the camera can see the slide and a couple of wooden mounting strips so the the slide can be dropped in and is held in place (as in a single slide mount.) A piece of white polythene bag acts a a diffuser. I didn’t paint the inside of the box black as this seemed unnecessary.
Since the camera and slide are always in a fixed relationship, once you have selected macro mode and no flash the process is very quick indeed. Certainly a slide every 10 -15 seconds is possible. The automatic settings do their job very well and obviously you dont’ have to worry about camera shake or alignment.
There is some barrel distortion but I tend to use PhotoShop CS to make any adjustments to slides in anycase so a little cropping isn’t a problem – very little if any of the projected image is lost. Some of the photos are Instamatic shots from the 1960’s and the results are very good indeed. I’ve tried various light sources including looking at a silde projector but sunlight seems best. Even on a very murky day in Southern England.
Thanks a lot for the posts
The below link will take you to the simple answer for qlide copying.
http://www.firstcall-photographic.co.uk/categories/copying-equipment/115/1
Note that the Ohnar slide duplicator/copier is only one of a number that have been around for many years. Using a similar duplicator with a Canon EOS 600 in the past I was able to duplicate slides for an A/V show that won an International A/V competition so quality was not an issue in this case.
I have not tried copying via the Ohnar et al from slide to digital but as we have complete control over the digital image it should be easier than duplicating a slide where control is only available at the time of exposing the image.
Hope this helps, good luck with the 10,000 slides by the way.
John Phillipson
I use my old slide show equipment. I have an all-in-one Ambico Video Transfer box, I marry my Kindermann projector up to it. The Ambico has its own macro lens. This is mounted on a bench, my digital camera is floor mounted on a tripod with the camera set to the height of the box. I insert a magazine in the projector which reflects the slide in the box. When the camera is switched on I wait a few seconds for it to settle down, focus, then press record. I hold each slide for approx 25seconds. I just need to remote the magazine to the next slide. On my computer I have installed Pinnacle Studio 9. After transfering the slides to the camera I just capture to Pinnacle as normal, now I can edit in the usual way, add music and voice, transitions, titles ect: By giving my slides the 25seconds I now have leeway to to adjust each down to the time I want,then output to DVD which can be played on a DVD player or projected on to a screen. I may not have the right jargon for this lark but when I was born they were still using candlelight magic lanterns!
(Tim: thanks for establishing this forum.)
My immediate interest is 35mm microfilm (cf 20 July 2007, “Batesy”): I was greatly disappointed to discover that the Brit. Library’s “microform” format, for selling theses, is 35mm microfilm rather than microfiche.
Below:
1: QUERY: 4000 DPI SCANNERS
2: ASIDE: MAX. USEFUL DPI
3: MY APPLICATION: TIME CONSTRAINTS
4: EXPERIENCE: B+W -ve -> slide +ve -> -ve print
[1: QUERY: 4000 DPI SCANNERS:]
Many posts here express dissatisfaction with dedicated 35mm scanners. If this is your experience, could you please report the spec’s of the scanner, as well as the model?
I’m curious as to whether 4000 dpi scanners have disappointed anyone, either with picture quality, or with post-processing overheads. 4000 dpi on a 24x36mm frame would be apx 24Mpix (though I don’t know if the frame-size on microfilm matches that of 35mm SLR cameras.); at face-value, one might expect the results to surpass a digital camera copy. But in practice? (Mog need not reply).
[2: ASIDE: MAX. USEFUL DPI]
Around 10 or 15 years ago I went through the exercise of calculating a theoretical dpi to match the grain-size in recording-film (emulsions optimized for detail, at the expense of tonal gradation, as used in microfilm). I don’t have the figures at hand, but my recollection is that I came up with a figure around 20-24 Mpix for 24x36mm, assuming pixel-size matches grain-size. That kind of approximation will still lose detail (due to averaging when grain-crystal edges overlap pixel borders); a Nyquist model would lead you to 80-96 Mpix, or around 8000 dpi. But, as grain presents in a range of sizes, one might double this dpi before throwing away the negative…
[3: MY APPLICATION: TIME CONSTRAINTS]
Consider: a thesis will have several hundred pages; I have an initial crop of 5 to read. These will lead to others. Any post-processing longer than a minute per page will be impractical. Even cropping the frame into individual pages is likely to occupy this time. (Though my initial problem is just affording the theses, let alone a scanner, or macro lens for the digital!)
[4: EXPERIENCE: B+W -ve -> slide +ve -> -ve print]
My father used to have a bellows-attachment, which I used in the 70’s. Around 5 years ago, no longer having this item, I copied some old deteriorating b+w negatives by macro lens 35mm SLR onto colour slide, and had these printed as negatives through a ordinary photo service. I jury-rigged a negative-holder onto the camera, back-lit by halogen lamp reflected off white paper. The result was lowish contrast, with a blue-mauve hue, but quite clear. Certainly worth having for the memories.
This is a similar idea to Tim’s light box but using a white light source should eliminate the need for colour modification. It is also cool and therefor will not damage / curl the negative/slide.
http://www.beckhamdigital.co.uk/productcart/pc/viewPrd.asp?idcategory=76&idproduct=189
Hi all
What a lot of lost time. I did my scans in the past (in Germany) like that:
Put 100 slides in a box, bring them to a good photoshop (one for professional phptographers or reporters) and ask for scanning them onto Kodak Photo CD. Only this Kodak format, not jpeg!!
They send your slides to a bigger processing company, they have a highspeed slide scanner for this Kodak format.
You get your CD back and the slides. One picture was so 18 MB big and the resolution so high, that you can see the structure of the film (50 ASA!!!!) or on a PC screen the picture is 1.5 metres wide!
The price was not so much, the CD contains 100 pictures. (I have 6000 slides and there it can cost something and I do not know where to go here, but Tesco people said they can send it to Kodac. But reconfirm this five times before they finish you with jpeg scans!!)
Dieter, Andover
Hi Tim
I have read through the comments posted and think collectively, I am now confident of some good results using your original set up….
One of the questions along the way was regarding a Cable Release for Digital Cameras? Answered by the use of the inbuilt timer Mode (Brilliant)
However, on searching for items with regard to my attempt at copying to Digital, I came across a cable release for Digital cameras that encompasses the Camera on the side of the Shutter control thus symulating the 35mm screw threaded mount release…
Obtainable on http://www.hama.co.uk for £12.99
Re Graham Parks (September 16th 2007) – how are you progressing with the “back” projection idea?
What projector material is suitable for this – ground glass?
I’ve read all the posts, and it seems to me that the simplest and most inexpensive solution is a slide duplicator, available for most digital cameras.
Here’s one for the Canon S2 IS from 47th St. Photo (US) for $59, but I think if you shop around, you can probably find them for less.
Also liked the idea above about having the slides duplicated at a photo lab. Here in the States, even Walgreens (a drugstore chain) offers slide duplication to CD.
There are also several services online that do this as well, including:
http://www.digitalmemoriesonline.net/scan/scan_pricing.htm
http://www.digmypics.com/OE/Pricing.aspx
Hope this helps.
Not much mention on this otherwise thought-provoking forum, about software for converting colour negs to true colour positives, once scanned. Does anyone know whether this is easy? Is there any software out there that will batch this sort of job, rather than having to do each one individually? Lastly – does the whole backlight and re-photograph idea work OK for colour negs, or just for slides?
This was just what I was looking for as I have 1 slide to do. Don’t want to spend ANY money and already had a sweet scanner. Thanks for the post.
I recently purchased one of the VuPoint FS-C1-VP slide scanners from the airline Sky Mall (Hammaker-Schemmler), which is probably the unit some have reported for about 100USD. One definitely gets what one pays for–the slide holders are plastic and don’t align the slides quite right, requiring some fiddling. I’m not sure the focus is absolutely correct, and the unit includes software that “fixes” the exposure, color, etc. for you–that is not a real problem for normal slides, but it sure messes up night shots. There does not appear to be any way to disable that feature, either. I am using a makeshift neutral-density filter atop the slide to improve the performance on night shots (it helps), but the unit definitely is not high quality. I am seeking a better alternative, preferably something that does not cost an arm and a leg and an ability to work with slides in Carousel trays would be highly desirable.
I wish there were an attachment that would couple a Carousel projector Ektanar lens directly to a digital SLR–that would provide a predictable light source and tray-handling in one package; in addition, the speed of image capture with the camera (I have a Nikon D50) is very fast, compared to the many seconds using the VuPoint device.
The VuPoint unit comes with software that can do some editing of the images. My Dell computer came with JASC software and that is what I have been using. Photoshop (R) it’s not, but it does a pretty good job. There are 2 products in the JASC suite: Jasc Paint Shop Pro 8 and Paint Shop Photo Album. The former has the larger set of editing functions and the latter has some multiple image functions to apply to a whole album (or selected images) in parallel.
If anyone has any idea of a set of hardware fixtures that could directly couple a Carousel projector to a digital camera, I would be very interested in learning about it. Thanks.
Hi
I have not read all the replies to your problem so you may already have had a similar reply but I use a Epson Perfection 1650 which has a frame to hold the transparences or negatives,the software will take care of the difference in the colour and Paint shop Pro does the rest.I am doing some negs and transparencies which I took 50 years ago and the prints come out as good as the original,you are not going to get higher quality pictures than the original that will depend on the transparency.It is worth it in the end and can bring back a lot of good memories.
We now use a good German magazine slide scanner to produce good quality scans at a reasonable speed and cost, and consistent quality. 1200 dpi is fine for normal use (viewing and manipulating the family photos), but our scanner will go up to 3600 dpi if required. Of course that is much slower, and produces much larger jpg files. ICE dust and scratch removal is also available, but in our experience is only worth using if the slides are in bad condition. More details at http://www.slidesoncd.co.uk
Thank you Tim for initiating this valuable and informative thread! I don’t think Mog was being unkind, he was being objective but if he had been around for 75 years and had used all the chromes that were available in the 60s he might have had a different perspective. I have a solution which might satisfy both of you.
I have the same problem as most other posters – thousands of Kodachromes to be digitised. Mine are of wild flowers, especially orchids, to be transmitted to websites. I can’t afford several thousands of pounds for a decent slide scanner.
My cameras are all Nikons but none are digital. However, I have several lenses and I have a 55mm f2.8 Micro-Nikkor for which Nikon still make a dedicated slide copying adapter. This is the ES-1 which also fits the AF Micro-Nikkor 60mm f2.8D lens. I recently discovered this adapter on an American website. Over there it costs an arm and a leg for two plastic tubes and two slide clips and a diffuser just as it does over here. The lowest price I could find was £42.72 delivered, from Amazon.co.uk.
Fortunately all Nikon bodies with the Nikon F lens mount are backward compatible with lenses so the D40 DSLR (NOT the D40X!) which is receiving rave reviews at a bargain basement price (£260) should make the perfect slide copier. I don’t think the metering will work accurately first time out of the box but since film is not being used experiments with manual settings should soon quickly establish perfect exposure with electronic flash.
most helpful ideas re slides to digital.
I am having reasonable results with a slide viewer (hand-held) and a digital camera set on macro.
also projected onto screen gives quite good results.
neither very sharp but at least its a good image that I can remember.
slides are 40 years old.
Please can someone clever!! answer a question.
Can I use old roll film SLR lenses on a digital camera? screw fitting.
Janie
Hello Janie,
I am clever but not that clever! I would have to be psychic to answer your question without facts.
1. Roll film – do you mean size 120 or 35mm?
2. Digital camera – is it a DSLR – what make therefore what lens mount?
3. Screw fitting – do you mean the Pentax M42 mount? I don’t remember any M42 mount lenses that were outstanding in their era which was then dominated by Minolta and Nikon lenses plus Canon later on. M42 mount lenses would not justify the expense of an adaptor to a bayonet mount. There were rumours of fantastic Russian M42 lenses for peanuts but quality control was so poor that I never saw a glowing review. Three Russian 35mm cameras which I bought only delivered average results.
I would pension off your M42 lenses, there are much better lenses available now.
Did Batesey 20/7/07 resolve his problem. I too wish to scan old newspapers on 35mm microfiche rolls and then use some text recognition software so that I can research by keywords
hallo peter r
thanks for reply.it was 35mm. various makes of lenses.
only thought to use them for the sake of sentiment ( presents)
will pursue idea of new system when funds allow!!
janie
Hi all, For any of you not wishing to do slide transfers yourself,Asda do them at 20p each-cheapest I could find.Fuji process ,no postage ,good result(though I have not compared with professional transfer).If I had some special slides I would pay the difference for a pro job but Asdas seem ok for average holiday pics.Did my half frame slides too.
Hi All,
They used to call me MOG but I am not the one who posted the comments about that super photo in Cornwall. MOG, in my case, stood for Miserable Old Git!
Back to the pics. Recently bought a Photofix Copier for scanning my 35mm slides which cost £99. OK to begin with then Ouch! Transfer times went from 5 seconds to way out. Went on the web to see if I could get some advice but the pro sites said OK for strip 35mm but not for slides. If anyone should know how I can get this thing to transfer at a decent rate please let me know.
Great idea Tim. I’ll give it a shot.
David – AKA Mog (2).
“I would pension off your M42 lenses, there are much better lenses available now.”
Don’t.
I must take issue with the staement that 42mm lenses are obsolete.
The 1.8 50mm Pentacon was judged by Photo Technique in 1976 to be the best standard lens available. Against Leica, Nikon, Rolleis Planar, the lot!
It remains a superb piece of glass.
In addition the new range of Zeiss 42mm lenses have bought current world class designs to those of us who still rate film.
I’ll back my super Takumars, Flektogons and Pentacon against any digital.
Check out how many 42mm/Eos adaptors are selling on eBay.
IMHO
Hello Tim
Like many older people I had a vast accumulation of 35mm slides and wanted to digitize them. The cost of having them processed by a commercial firm would have proved very costly and the few I submitted for test copying gave very poor results, pronounced streaking.
Having recently purchased a new camera, a Fuji Finepix S8000fd with 8Mpixels & a SuperMacro facility focusing down to 1cm (0.4″). I placed a slide on a small lightbox and held the camera approximately this disance in front of the lens and produced a fair digitized copy. Even the facial detection system works in this copy mode!
To eliminated camera shake and make the copying easier I then designed and manufactured a simple rig to attach the camera to and position the slide to be copied at the correct distance cover the entire film area, negating any need to crop the digitized image as the camera has a 3:2 quality setting. I have used this rig with both a lightbox and with a white diffuser positioned behind the slide using either the sun or a 60watt lamp as the light source.
The beauty of this rig is that it doesn’t require a steady hand (older people again) or the use of a tripod.
If you are interested I can supply photographs of the rig and drawings for producing the rig. No great skill is required as all components are produced from easily available alluminium sheet and assembled using super Glue.
If you are interested supply e-mail address.
Regards
Clive Wright (Paaaaa)
Hello Tim
I’m afraid I’m a latecomer to your site. I likewise have tried a quite expensive Nikon scanner (belonged to my son) – which worked well for B&W negatives – and recently a new Epson V100 scanner with an attachment – neither could get quality enough or answer the pressure of 3000+ slides.
Having seen a letter in PCW mag suggesting a DSLR plus a projector, I have managed so far 71 boxes of slides – without further expenditure – using a Kodak Carousel S and my new Nikon D80. The latter has a nice cable release. Quality varies and the curvature of the slides can be annoying but I have got a reasonable average. A big problem seems to be that my best colour slides were if anything underexposed: Kodachrome 25 and the 64. Digital cameras prefer slight overexposure!
Taking the pictures is fast – at first I used a jpeg setting but have now had to fall back on Raw processing. Doing this in Photoshop is great but is driving me mad (I even dream in matadata).
What is good is that I am arriving at ‘new’ solutions for many slides and have been able to correct things which have been wrong for many years! -The flexibility all this gives is amazing. It can even deal with PINK ektachromes…
Keep working
Duncan Davies
Just viewed this forum today. Very interesting
I have an HP S20 slide scanner that produces 20Mb bitmap files from a 35mm slide.
It also handles colour negative strips (4 to 5) negs) and will scan small (up to 6″ x 4″) prints.
It seems quite good to me but am not sure how it stacks up against other systems. It is specified as 2400 optical dpi and 36 bit colour.
When I bought it, some years ago, the alternatives were twice the price (£700 against £350) and the slide scanner add-ons for A4 scanners were very poor. However, these scanner add-ons now seem to have improved vastly, judging by some of the results obtained by friends.
This submission is triggered by a friend asking my opinion on the http://www.technologyinthehopme.com scanner, now £79.95. It says it uses a 5mpix sensor with 3600dpi “interpolation” (presumably actually less and softare generated – but you can’t make it up to produce real increased definition) and 48 bit colour.
Does anyone have any experience of this device?
By the way, I am not writing this a six-thirtyish in the morning but three hours later !?
Geoff Higgs
(oops — time fixed now!)
Clive Wright,
I would like to see the photographs of the rig and drawings for producing the rig. I will begin digitizing quite a number of photos, slides, and negatives and am looking for an easy and quick way of doing this. My email is ssheffey@yahoo.com
Tim, thank yo soo much for starting this. I like and will use your idea also.
I used to have a darkroom and I still have the enlarger. I would like to try to put the slides in the enlarger where the negatives are normally inserted, and project them on a ground glass or a diffuser. Then to place my digital camera on a tripod in front of the enlarger which would be positioned parallel to the ground and take a picture of the projected image.
What do you think of this idea?
Would the enlarger light be to harsh or too hot?
I haven’t had the time to try it, but I’d like very much to hear your comments.
I’ve been toying with this light box idea myself. I jury rigged up something just as a trial and got a nice sharp, evenly lit slide to photograph with my digital camera set on macro. The problem is the camera will not focus the slide. It does fine with any other object at the same distance. A darkened room or a lit room does not seem to make a difference. Anyone else come across this problem and solved it. thanks
Thanks for a detailed article! I’m interesting to try scan some b/w films using my HP 3100 all-in-one device. You mentioned, that you tried it, and the results were not satisfied. Have you used any slide adapter or just put the film on scanner? Do you know anything about the following “HP C2521B Transparency Adapter”?
Thanks again!
Thanks for that Tim I have loads of old slides that have been put away at the back of the cupboards, that I will have to dig out now. Might also try this method on some of the old Glass Plates from my collection.
Andy
http://www.udiggit.com
Clive Wright’s idea appeals to me. The whole thread has been good to read. For starters Clive can you email me details of your method. toad@pinkies.demon.co.uk
Clive Great idea. Just what I’am looking for. Can you send me the details?
Being a real tightwad (and OAP) I applied some lateral thinking and have made some surprisingly good digital copies of treasured slides by simply blutacking a slide onto my flat computer screen and ‘snapping it’, not even using macro, just zoom: macro shows pixels. I have a small tripod and will be experimenting with my bigger Fuji rather than my wife’s bijou Canon Ixus 70 (when I get it back from my son!). The computer is therefore my lightbox and I use a blank Word screen as lighting. I expect I’ll eventually find the brightness control to wind up the ‘backlighting.
Mike: points for creativity!
WoW, what a font of info, well done all. For what its worth, I have just bought a Canon EOS 450D and dug out a Jessops slide copier and T2 adaptor. I dug out my slides and found the camera/copier crops the pictures quite a lot BUT discovered that pictures of aeroplanes taken with a compact camera in the early ’60’s could be framed perfectly. I also tried colour negatives, again with small aeroplanes in the center, now that was fun! After loading up the picys on to my computer I used PaintShopPro8 and viola, ended up with pictures! I also copied some of those stereo pictures that kids have in viewers.
I can only recommend thinking out of the box and experimenting, you never know what you may find, I think its a undiscoverd artform!!!
when I use my printer etc. message says” better results from Hi-speed USB port.
can I buy a plug-in, or does it mean that it has to be “plumbed-in” ! to my PC
janie?
Tim,
I have a Sony DSC S650 digital camera that kicks into a macro phase when you just “zoom in”. It been a great $135.00 camera.
What I did is take my old flat screen montitor, adjusted it to angle backwards as far as it can and set my slides on it using the normal slide frame to set them apart (pretty acurate spacing as its made to feed acurately through a slide machine).
Next I made a top and bottom rail for the camera to sit on (think 90 deg. angled alum. pieces) and atached these to the sides of the monitor – this allows the camera to slide consistently “in-line” with all slides horizontally on the monitor screen. Then I just “slide” the camera along this rail, one by one seeing that things are alighned in the rear LCD screen on the Sony and use the built-in delay setting on the camera to take the final photo. Works like a charm. Once you have the “macro zoom” dialed n there is virtually no further adjustment needed as the distance fro lens to slide remains constant.
It is very easy to make the camera slides and very easy to move the camera from slide to slide. I can also do a little more “zooming in” with this set up because the macro (zoom-in) ability is not all used up yet. NOW! Use the monitors normal screen adjustment conrols for more or less light through the slides or change the background color for some starteling effects (i.e.: change WORD TEXT background to YELLOW – RED — BLUE etc.)
I have had a lot of fun with this and once you get the hang of it you can slide the camera along at a 4-6 slide per minute pace with no problem.
PS – don’t try and use a typical “tube” monitor for this. All you’ll get is frequency lines.
PPS – YThe color primnts from these digital repros print out nicely up to 5×7. Beyond that the focus blow out…..
PPPS – and yes for those of you who might ask, prelim first year patent apps are in place on this – but have fun for now.
Joe K.
I was doing a web search and came across this website which I visited over a year ago…although, some valuable information has been added since then, I find it more interesting that this reads like a conversation at a social gathering. If you didn’t look at the dates entered, you would have thought the conversation took place within an hour instead of a year. Amazing.
Hi as an old codger who has been into dev/printing since 1950 I used a lash up with an old enlarger lying on its back with the base removed, white plastic (sanded to remove reflections) & a simple flash gun in place of the enlarger lamp for light. The camera was mounted on a slideing mount & then on a small tripod & used a quality enlarging lens mounted on bellows. I managed to duplicate colour slides for friends & family, & processed the film myself. The whole setup was held in place with plasticine on a board for portability. The enlarger was homemade, using a Foxs Glacier Mint tin for the light box, & bits of an old slide projector for the film holder. The bellows & focusing was all homemade & the lens mount came out of a camera that had been underwater for some time.
Hi
I started to scan my mothers 3000+ slides with the Nikon 4000ED film scanner which also does APS films and 35mm negatives which was an advantage too, but I found with 35mm slide scanning it just took too long doing one at a time, i then did a quick search online and found a company who take all the pain out of scanning, they are called Mr Scan http://www.mrscan.co.uk
These guys offer a great quality fast scanning service. I returned my Nikon scanner and got Mr Scan to do all my photos. After my refund from Nikon i actual had all my images and money left over. Note: Don’t attemt to scan yourself, its cheaper to go with a professional scanning company.
Isla, Farnham, Surrey
Regarding ‘cheaper to go with a professional scanning company’ — I think it all depends what equipment you already have. In my wife’s case, for instance, she already had everything she needed: a macro lens, a light box, a tripod, and some time to spend on it.
I tried Mike Ogglesby’s idea of using a PC monitor screen, with blank white document showing, but got a fine “fishnet” pattern in the background of the slide: on studying the monitor with a magnifying glass, I found the same pattern there, invisible to the naked eye.
Any ideas to avoid?
Yes, a great page with plenty of interesting ideas. I’ve got a few AV slide shows that I need to transfer over to DVD and that means scanning around 1200 slides. I’m long-term unwaged due to ill-health and can’t afford to pay to get them scanned.
I like the idea of using one of my slide projectors, and pointing the camera into it. But do I need to change to a different projector bulb, and do I need to put anything between the slide in the projector and the camera lens?
I like John crane’s set-up but John, what is in that Ambico box?
And finally, I have a Panagor slide copier with a Pentax PK mount, does anybody know if I can get an adaptor to use it with my Canon S2i?
What an interesting forum! I have over 30,000 slides which, sooner or later, I want to transfer. I am still using slide film, but my son has gone over to digital, with Canon EOS.
My Jessops slide copier crops rather severely, as mentioned above by another contributor. I wasn’t aware of one specifically for use with a digital camera – must investigate! My all in one Epson Photo RX585 is hopeless for this sort of task, but great for scanning prints. Son and I have done some experiments: I project the slide onto a white wall we use as a screen, and my sone photographs them from that. He sets the camera at 400asa.
By the way, there has been some comment above about the light box: size, type of lamp, etc. The one I have came from London Camera Exchange in Southampton, and cost about £15.
Hope this helps!
I have tried the purpose built 5 Mpix slide and negative scanner available at around £80.00. Did not like the quality and had to send it back. It seems there is another – Plustec Optifilm. Not sure how good that is but…
Anyway I will be trying the method described by Tim and others. I also have a lot of colour negatives. Can these be photoed the same way? And what software will convert the image to original colours?
I lashed out all of £15 for a Jessop Lightbox, but results with my Canon A70 Compact were poor: focus was inconsistent, and colours were inconsistent.
I have tried the Asda route (see Alan Bray, March 22 2008), but although picture quality was good, there was severe cropping of the image top and bottom in landscape format
hi thanks for all the great info was looking at the small digital scanner at about 100 dollars so the feedback was great. had tried the digital camera with photos but got flare of photo paper any ideas. will try the light box idea for the slides or the slide viewer with the camera on macro sounds good also. also is there a way to convert negatives to photos anyone know of software for this.
Hi, I tried the home made box and shot a few slides. Results were better than the 100 dollar/£ scan boxes. But need to refine the technique as slight movement and apereture settings can make things inconsistant. Also my macro is 1:1 so had to do almost 50% cropping thus wasting on quality. Using higher value aperture seem to be better as focusing was not that critical.
Also shot some negative and used “invert” in Photoshop. That seemed to sort of bring the original colours back but then had to use level control for red, green and blue individually by bring the left hand slider inwards on each colour and then final level adjustment on RGB.
To do this after inverting the scanned image create new adjustment layer and choose level adjustment. From channel drop down menu select red, and bring left hand slider inwards, then do same for green and blue untill satisfied and all looks natural.
That seemed to reproduce the original colours. There might be another way of doing it but this may be a start!!
Some great comments – but has anyone had any good results from a lower priced dedicated scanner – if so which one as the other methods seems too time consuming for someone technologically challenged
I have been wanting to convert over 1000 of my slides of 1965 vintage and had been trying to find some good method of digitizing them. Thanks to Tims blog, one has had some good ideas to do it at home and in an inexpensive manner.
I have specially liked Clive Wright’s idea of creating the Clive Rig and would like to try out the same. Clive, can you send me the drawings/ photos as you have mentioned. Kindly send me at my email address – given below.
Thanks for all the info. It is enlightening.
Jogi
So simple, yet so effective.
I have been looking for a scanner to copy our old family photos.
Thanks for the information, I will certainly give it a go.
Lovely picture by the way.
Michelle
Recovering from leg surgery gives me plenty of time to read… including Tim’s postings.
I am also interested in building Clive Wright’s box but do not have his e-mail address. Could you forward it to me (nelly.lopes@cox.net)? Or this message to him.
Thank you,
Nelly.
Great practical ideas to solve the slide scanning issues. I have around 2000 to digitize, some taken out of an aircraft window over Alaska in the late 60’s.
Reading the reviews of all the scanners, it seems that the process is slow with very indifferent results and software plus the scanner costs! Cannot add to the knowledge yet but will come back with my results.
Clive, please could let me have the drawings and Joe K, could you send a diagram or photo of your setup please? Email below. Thanks in advance.
Really good site and thanks to all who contribute.
tony@tshelmerdine.freeserve.co.uk
yes i have tried to digitise slides with the projecting onto screen then photographing method i was very suprised with the results much better than i thought but after a long debate with myself i have decided to buy
myself a plustek 7300 scanner copy my slides then sell the scanner on
they seem to bring a good price second hand on ebay if are kept in good condition, good luck to all you slide merchants.
Clive Wright
Just read your post 2nd April 2008 and would be very pleased to receive details of your rig for copying colour slides into a digital camera. Many thanks in advance. My email is roystonharris@dsl.pipex.com
Royston
Hi, I also have read the post by Clive Wright and would be pleased if he could forward details of his rig for copying colour slides with my digital camera. Many thanks.
Ivan Dickason
WELL I HAVE DONE WHAT I THOUGHT WAS GOING TO BE THE BEST
SOLUTION FOR GETTING GOOD RESULTS FROM MY FORTY YEARS OF
STORED SLIDES, I HAVE BOUGHT A NEW PLUSTEK 7300 SCANNER, I HAVE DONE ALMOST 200 SLIDES IN A FEW HOURS WITH EXCELLENT
RESULTS, ONLY A FEW THOUSAND MORE TO DO AND EVERY MINUTE
DOING THEM A PLEASURE. BY THE WAY I AM NOT AN AGENT FOR
PLUSTEK SCANNERS JUST A HAPPY AMATEUR PHOTOGRAPHER.
HAPPY SCANNING.
Coming late to the party here but my experience might be useful.
I have tried multiple scanners including the top of the line Nikons and finally spent the money for an Epson 750 Pro. It provided the best quality all around but like all the others still did not provide real sharp and faithful copies. It did provide good enough quality for converting the slides to video and I developed a good working process that permitted me to deliver a video in short order, but I do not consider the quality at a sufficient level for “replacing” the slides themselves.
That leaves a quandry as to what to do BUT in doing this project, I ran across another issue that you all need to be aware of.
I had stored my slides (some back to the 60’s) in plastic slide pages as they made it easy to review large amounts of slides quickly. Unfortunatly I discovered that the plastic pages from the company called Coast Plastics (are a stiffer type of plastic) are rapidly degrading and they are both degrading the slides quality and leaving residue on the slides. AND the residue is different based on the slide type. Ektachrome seems to have oily spots on the emulsion and the Kodachrome has oily smears on the non-emulsion side. In either case, the residue requires manual cleaning and in some cases it is doing damage to the emulsion.
This issue aside, I am looking to use the newer Canon 5 Mk II (coming out next month) with a light box and a macro lens to convert to digital replacements of my slides. This camera is supposed to be 21 Mega Pixel which from all my research is supposed to be close to the resolution of an Ektachrome and near to the Kodachrome resolution. I am hoping this will resolve the sharpness and contrast issues and provide RAW images that will enlarge similar to an actual 35 mm slide.
I will come back and report when I get this setup running but from all my efforts I am ready use this method as I believe that I cannot wait much longer without loosing the images altogether.
Scanners do not work to a level that I am pleased with but that does not mean that they will not work for some levels (such as inclusion in a video) so I do understand other’s enthusiasm and I m happy for them. I simply want something that will do justice to all the work and care that went into my 35 mm.
Do check your slide pages…
Hello all. I have too many slides to scan. I did borrow a Nikon dedicated scanner but decided I would need another lifetime to scan half of my slides. I now have a EOS40d with a Tamron 90mm macro and a large light table which was previously owned by the local newspaper. I have a Jessops slide copier but remembered that it will be subject to the cropping resulting from the 1.6 magnification factor of the camera as it is not full frame, so I decided to use the lightbox with a tripod and the macro lens.The immediate results are impressive, once the White Balance on the camera is adjusted. The Live View mode makes focussing much easier, and the self timer helps avoid shake. The real skill lies in not kicking over the tripod, as the central pole is horizontal with the lightbox on the floor.
Hi, thanks to Tim for an excellent and informative discussion. With reference to Clive Wright’s post can I add myself to the list for the details of the rig for copying colour slides with a digital camera. My e-mail address is brian.elsie@virgin.net Many thanks, regards Brian
Hi, thanks to Tim for an excellent and informative discussion. With reference to Clive Wright’s post can I add myself to the list for the details of the rig for copying colour slides with a digital camera. My e-mail address is willmac@lantic.net
Many thanks,
regards
Hi, I tried your home made slide scanner using the same setup but the digital camera would not focus on the slide whatever I did. I set it on a tripod, used macro mode etc. Light source was a fluorescent tube 10W Philips daylight in a normal lightbox. What could I have done wrong?
Shani: how far away was the slide from the lens? It sounds like it might have been too close for the lens to focus. If you have the ability to set the focus manually, try setting it as near as possible and moving the camera to find the correct distance.
Otherwise, it’s just a case of moving the camera further away I’m afraid. We tried with a macro lens attached. I know that some compact digital cameras have ‘digital macro’ mode which can focus very close to the lens, but haven’t tried it for this sort of application so I don’t know if that’s suitable.
Re slide problems Projecting slides thru a slide projector
always gives you a “tunnel effect” the centre area is always brighter
than the periphery Try replacing the bulb with a practical LED device
Hello Steve Wright
Could you please send me details of your slide copying rig and instructions on how to make it? My email address is dotandtonyk@btinternet.com
Thanks very much
Tony Keates
[…] has been quite a response to a comment made by Clive Wright on a previous post about digitizing 35mm slides. Here’s what Clive said: Having recently […]
This post contains some more details about Clive’s method.
Tim: You gave me a good idea which I will share here. I have an old Bell & Howell slide cube projector (see site http://www.old-photo.com/pages/bell-and-howell-slide-cube-projector.htm) and on the front of it, it has a slide “Preview / Edit” screen where the slide passes over just prior to entering the lens for projection. The “Preview / Edit” screen is back-lit. So taking your idea, I just held my Canon A530 over it with the macro setting and snapped the pictures. They came out pretty good. I feel I could really improve them by setting up my tripod, as you did, to steady the shots. The beauty of this setup is that to digitize the next slide, I just press the button and advance the projector. The next slide moves right into the “Preview / Edit” window. I will let you know my results.
Thank you,
Don
well thats all very interesting i have a film scanner that will scan up to approx 36 medium format transperincies depending on dpi eg 300dpi approx time per scan at 16bit col 25-35sec this is true col depth and mot scans at same size can be enlarged to A3 with no image break-up at all eg 6x9cm enlarged to 30x40in scaned at 600dpi no problem but this is a comercial grade scanner for prepress and graphic arts reproduction
Hello Tim
I’m fascinated by the ingenuity and resourcefulness of the participants of this site. Like all, I have thousnads of slides to preserve, but not thousands of hours to copy them. Can I add my name to the list to get a opy of Clive Wright’s Rig for slide duplication. Thanks for taking the time to spread this information. This is so helpful.
Thanks in advance for Clive’s contact info.
Best
Alan Snelson
Alan: see the comment from November 14th. You can see the full post detailing Clive’s method here:
http://cyberelk.net/tim/2008/11/14/clive-wrights-35mm-slide-rig/
Tim, this is a great idea that works quite well. My wife has been going thru 1,000’s of slides – picking out the best ones to eventually scan. (I found your site while looking for slide scanners.)
Took photos of three slides on a slide lightbox with a Panasonic DMC-FZ20 digital on macro, loaded them into the laptop and cropped them – voila! Fast & easy to just slide them past the camera and the results are just fine for viewing on the computer monitor (which is where we view most of our photos these days!
Thanks again!
Taking the slide with the digital camera to transfer them to the computer is my aim. I don’t have a slide scanner at present but am considering a purchase. The idea of taking the slide looks very tempting. How do you make a Light Box or do you have to purchase this piece of equipment???
Easy enough to buy one. See my earlier comment about that.
I basically copied this idea – but added an improvised method to get even light behind the image – instead of a lamp under my lightbox, I lay my monitor flat (showing a plain white desktop background), but the lightbox window on top of that, and slowly adjusted the brightness down until I got good results.
Would never have thought of this without your great blog post – thanks.
Hello,
What do you think of this thing:
VuPoint 35mm Negative Film Slide Digital Converter
http://www.amazon.com/VuPoint-FS-C1-VP-Silde-Digital-Converter/dp/B000V7CPJG
Thanks for the shoot the slides idea,
steve
Does not doing it this way take a lot of time. If oine has thousands ofslides, it could take tears.
You can’t imagine how I’m hapy to see I gona save my 4.000 old slides from 1967 til now, using this simple sistem… Tanks and sorry my english… I’m from Brazil.
Doesnt this take a long time for each slide? If you have a few thousand to deal with, you wnat something really snappy. Any suggestions? Joe
It has been a while since this post and technology has hopefully evolved enough to produce slide scanners of much better quality. There are, however, some requirements that need to be taken care of in favor of having a good quality scan of a slide or film.
Some tips may be found here:
http://slidescannertips.com/flatbed-slide-scanner/
Michael
To cut down on the time it takes to scan your negatives make sure the scanner you buy is capable of batch processing. This could cut down your processing time by a factor of 5 or 6. The prices for scanners continue to come down and the tech just keeps getting better.
Great info here though if you fon’t want to go the buy route.
I just made my own 35mm automatic slide scanner based on a Nikon camera and Kodak projector which are tied together with a control box I have designed for the purpose. It runs perfectly and scans my slides fast and easy – so the method is highly recommendable. You can see a description with pictures and an equipment list here http://www.avidia.dk/hardware.html
[…] following sites are great references for more of the same information: Print Head, Simple Slide Copy Jig, Macro Lens & Tripod. This entry was posted in Digital Cameras, Film […]
Hi Tim, I was looking at getting a film scanner a few years ago but poor Linux support put me off. I did find VueScan, http://www.hamrick.com/ a commercial but inexpensive scanning program that started out specialising in film scanners and is available for Linux. The author signs NDAs, etc., with manufacturers to get the specs required, IIRC.
We’ve since got one of these: http://www.firebox.com/product/2614/Photo-and-Negative-Scanners (the SD version) which works very well without needing any computer at all.
I caught your website as my mum is looking for a similar solution for boxes of 35 mm slides that my grandad had.
I just had to reply to you when I saw the Pixie House at Boscastle in Cornwall.
The Pixie House was washed away when the flood hit Boscastle a few years ago and this would be a very important picture to the local history I am sure.
I haven’t been back to Boscastle since the flood so I’m not sure what is in its place.
Sharon: thanks, yes I knew about the flood, and we’ve been to Boscastle since then. I’ve updated the article to show a picture of what’s there now.
[…] year ago someone was selling one for $2500! This approach might help: http://cyberelk.net/tim/2007/03/04/d…slide-scanner/ duckduckgo is my […]